Increase your blog traffic with Twitter

Note from the blog owner: This article is partially outdated; Twitter Feed was shut down on October 2016. 

One proven way to redirect traffic to your new posts is “to tweet” them.  In other words, if you write a new blog entry, make sure you also create a new tweet for it. This simple procedure will give some traffic on the fly to your new posts.

“Tweeting” your posts has several benefits, but I would like to enunciate two of them:
  • It allows you to have visitors even before the major search engines (ex. Google, Yahoo, Bing) have indexed (and crawled) your newly added post.
  • If your post content is good and sticky, you will gain flowers on Twitter, which means the possibility to increase your traffic in an exponential way, due to the viral nature of this micro-blogging platform.
All this sounds good, but you should agree with me that adding tweets by hand is boring. If you are a lazy blogger like me, you should find a way to create the tweets automatically, after a new post entry has been published.

I am sure there are several ways to do this, but here is my own:
  1. Create a new Twitter account for your Blog. Notice the blue pigeon to the right of this page: it links to my Twitter account: http://twitter.com/yanniel_alvarez. This is the account I use for tweeting my blog posts. Take a look and notice how all my posts have been tweeted.
  2. Create a new account in Twitter Feed. This is a really cool system that allows you to “feed your blog to Twitter”.
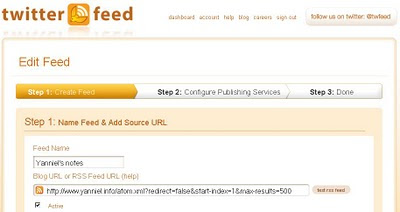
  3. Configure Twitter Feed to redirect your blog post entries to Twitter. Just follow the given instructions, which are very straightforward. The most important things you need to remember are authenticating to your Twitter account, providing your Blog’s feed URL and setting the update frequency of your tweets. [1]
The following snapshot shows how I configured the feed for my Blogger Blog (www.yanniel.info). In your case, it might be slightly different depending on the blogging platform you are using.

Twitter Feed Settings

Once this is done, you don’t have to worry about updating your Twitter account; instead, the tweets are created transparently every time you add a new post.

Note:
[1]: The update frequency can be found under Advanced Settings (Twitter Feed). By default the update frequency is 30 minutes.
Avoid your Debit Card Monthly Fee by opening a Tax-Free Savings Account (Canada)

RBC clients have to pay a monthly fee as a compensation for using (or holding) their debit card (client card). The amount varies depending on the plan you have chosen. In my case, I have to pay $4.00CAD each month. This allows me to perform up to 13 transactions. Other clients, with higher privileges, are allowed to execute more transactions and for that a higher fee is applied.

If you want to avoid this Monthly Fee, I suggest you to open a Tax-Free Savings Account (TFSA). For that, go to your near branch of RBC and ask for a banker (account manager). Tell this banker you want to set-up a Tax Free Savings Account. There is no minimum deposit to open this account; in my case I just put 10 dollars, which is a good idea if you don’t want to put much money in this investment.

By holding a TFSA you become an investor of the bank, which is why they refund you the $4.00CAD of your Monthly Fee.

The following picture was taken from my online banking account:

Online banking showing the Monthly Fee and the MultiProduct Rebate

Notice a monthly fee of $4.00CAD applied on November 2nd (see red rectangle).  Notice also on November 2nd, a deposit of $4.00CAD (see blue rectangle). The deposit, labeled MultiProduct Rebate, was made as a compensation for being an RBC investor; in other words, I was rewarded with $4.00CAD for having a Tax-Free Savings Account with RBC.

It’s easy to figure out that the difference between the monthly fee and the MultiProduct Rebate is zero. This means, you will be saving 4 dollars each month…it’s like avoiding your Debit Card Monthly Fee. You will save $48CAD annually.

Holding a Tax-Free Savings Account gives you more advantages, but I will talk about that in further posts. Feel free to ask any questions in the comments section, I will be glad to answer them if I can.

Implementing the Singleton Design Pattern in Delphi without Global Variables

The purpose of this post is NOT to cover the insights and applicability of the Singleton pattern, instead  I just pretend to give you a Delphi code snipped that implements it. This implementation is focused in avoiding variables that are global to the unit (or Unit Global Variables).

Fist of all, I am borrowing the definition and UML diagram of the Singleton Design Pattern, as written in the Design Patterns: Elements of Reusable Object-Oriented Software book. I strongly suggest you to read this book if you want to have a deeper understanding of the classic design patterns.

Singleton: “Ensure a class only has one instance, and provide a global point of access to it.”

UML diagram:

UML diagram of the Singleton Design Pattern
For all Delphi versions previous to Delphi 7, the only way to implement this pattern is by using a Unit Global Variable, instead of a class static field. Fortunately, Delphi 7 featured class variables long time ago and this way, we can implement the pattern avoiding global scoped variables. For some reason, I have never seen an implementation of the Singleton pattern in Delphi using class variables, so here is my own:

unit Singleton;

interface

type
  TSingleton = class
  private
    //Private fields and methods here...
   
    (****************************************************)
    (*** Class variables were introduced in Delphi 7. ***)
    (*** Older Delphi versions should implement       ***)
    (*** this field as a unit global variable         ***)
     class var _instance: TSingleton;   
    (****************************************************)
  protected
    (*** Constructor is protected!!! ***)
    constructor Create;

    //Other protected methods here...
  public
    destructor Destroy; override;

    (********************************************)
    (*** Client code should use this function ***)

    (*** ("Instance"), instead of the         ***)
    (***
"constructor" to create (or access)  ***)
    (*** a singleton instance.                ***)
    class function Instance: TSingleton;
    (********************************************)
    

    class function NewInstance: TObject; override;

    //Other public methods and properties here...
  end;

implementation

{ TSingleton }

constructor TSingleton.Create;
begin
  inherited Create;
end;

destructor TSingleton.Destroy;
begin
  _instance:= nil;
  inherited;
end;

class function TSingleton.Instance: TSingleton;
begin
  if (_instance = nil) then
    _instance:= TSingleton.Create;

  result:= _instance;
end;


class function TSingleton.NewInstance: TObject;
begin
  if (_instance = nil) then
    _instance:= inherited NewInstance as Self;

  result:= _instance;

end;

end.


There was a problem with my original implementation. In Delphi:
  • Constructors are inherited (this doesn't happen in C++, Java, C#, etc.)
  • All classes inherit from TObject ultimately.
As TObject has its own constructor, the consumers of the TSingleton class can call it directly, allowing this way the creation of more than one instance. Ali, writer of the first comment in this article, pointed me in the right direction.  Thanks Ali.

I traduced Ali’s words into the source code above. The strikethrough text can be removed and the text in blue was added. This implementation ensures the singleness of the Singleton Design Pattern in Delphi.

Rethinking over this once again:

The implementation above ensures the class only has one instance; but it does not provide a global point of access to it. Instead of that, we now have two points of access. Take a look at the following code snipped:

  //Point of access ONE
  SingletonObject1:= TSingleton.Create;
 
  //Point of access TWO
  SingletonObject2:= TSingleton.Instance; 

Yes, two point of access: TSingleton.Create and TSingleton.Instance.

Rethinking this many times, I figured out the simplest implementation. We don’t even need to deal with the evil NewInstance class function. It looks like this:

unit Singleton;

interface

type
  TSingleton = class
  private
    //Private fields and methods here...

     class var _instance: TSingleton;
  protected
    //Other protected methods here...
  public
    //Global point of access to the unique instance
    class function Create: TSingleton;

    destructor Destroy; override;

    //Other public methods and properties here...
  end;

implementation

{ TSingleton }

class function TSingleton.Create: TSingleton;
begin
  if (_instance = nil) then
    _instance:= inherited Create as Self;

  result:= _instance;
end;

destructor TSingleton.Destroy;
begin
  _instance:= nil;
  inherited;
end;

end.

The only point of access to the singleton instance is the class function “Create”, which hides the TObject.Create parameterless constructor (more details here). Now we have only one instance and a global point of access to it.

The comments inside the above code are self-explanatory. Furthermore, for those stuck with older Delphi versions, the Singleton pattern should be implemented as follows:

unit Singleton;

interface

type
  TSingleton = class
  private
    //Private fields and methods here...
  protected
    //Other protected methods here...
  public
    //Global point of access to the unique instance
    class function Create: TSingleton;

    destructor Destroy; override;

    //Other public methods and properties here...
  end;


var
  _instance: TSingleton;
//Unit Global Variable.
 

implementation
...................

As a conclusion, I would suggest avoiding unit global variables as much as possible; in fact, as a rule of thumb, I would suggest to make your variables' scope as local as possible. This applies not only to this example (implementation of the Singleton Design Pattern), but to programming in general. Furthermore, the class variables in Delphi are equivalent to static member variables in C++, Java, C#...Class variables were introduced  in Delphi 7; so, previous versions should use global variables to implement a Singleton class.

Note:
There are three books about Design Patterns I would suggest you to read:

How to implement a tag cloud. Learn by example

A tag cloud [1] is a list of terms in which each item has a corresponding weight. The weight represents the importance or popularity of each term.

Tag clouds usually have a visual representation, and the weight can be translated into a different font size, color, style, text orientation and others. Changing the appearance of each tag in the cloud allows the readers to perform a quick scan and detect the most ranked terms in the cloud.

One final consideration is that tags are generally linked to some related content. This can be achieved for example, by means of a hypertext link (...a href=...) anchored to the affine content.

There are several algorithms to implement a tag cloud; however, right now I'm going to use a fairly simple one: it just changes the font size of the tag depending on the number of occurrences per tag. The general formula (taken from Wikipedia and adjusted by me) is:

Si = |Fmax*(Ti - Tmin)/ (Tmax - Tmin)|

for |Fmax*(Ti - Tmin)/ (Tmax - Tmin)| > 90%;

else Si =90%.

Where:
  • i: is an index ranging from 1 to the total number of tags in the cloud.
  • Si: is the display font size of tag i. You need to calculate Si for each tag in the cloud.
  • Fmax: is the maximum font size value to display. This value is chosen by the user.
  • Ti: is the number of occurrences of tag i.
  • Tmin: is the minimum of all Ti values.
  • Tmax: is the maximum of all Ti values.
Too difficult to understand? Patience, you'll get there:

Consider the following list of twenty tags. The number of occurrences is shown inside red square brackets "[...]":

linda evangelista [9]
toaster [12]
brad richards [7]
max talbot [13]
fireworks [10]
library of congress [12]
bohemian grove [15]
declaration of independence [2]
17 day diet [16]
independence day [10]
white sox [5]
blaise pascal [4]
ewan mcgregor [10]
kate moss [6]
princess diana [10]
traffic [1]
janet jackson [11]
canada day [8]
scott pilgrim vs. the world [10]
paul newman [18]

For the list of tags above, the corresponding Ti values are: T1=9; T2=12; T3=7; T4=13; T5=10; T6=12; T7=15; T8=2; T9=16; T10=10; T11=5; T12=4; T13=10; T14=6; T15=10; T16=1; T17=11; T18=8; T19=10; T20=18.

Now, it's easy to see that Tmax=T20=18 and Tmin=T16=1. Finally, let's set Fmax=300% [2] and let's calculate each Si:

S1 = |300% * (9 -1) /(18-1)| = 141.17% = 141%

S2 = |300% * (12 -1) /(18-1)| = 194.11% = 194%

S3 = |300% * (7 -1) /(18-1)| = 105.88% = 106%

S4 = |300% * (13 -1) /(18-1)| = 211.76% = 212%

S5 = |300% * (10 -1) /(18-1)| = 158.82% = 159%

S6 = |300% * (12 -1) /(18-1)| = 194.11% = 194%

S7 = |300% * (15 -1) /(18-1)| = 247.05% = 247%

S8 = |300% * (2 -1) /(18-1)| = 17.64% = 18%;
as S8 = 18% < 90%, then S8 = 90%.

S9 = |300% * (16 -1) /(18-1)| = 264.70% = 265%

S10 = |300% * (10 -1) /(18-1)| = 158.82% = 159%

S11 = |300% * (5 -1) /(18-1)| = 70.58% = 71%;
as S11 = 71% < 90%, then S11 = 90%.

S12 = |300% * (4 -1) /(18-1)| = 52.94% = 53%;
as S12 = 53% < 90%, then S12 = 90%.

S13 = |300% * (10 -1) /(18-1)| = 158.82% = 159%

S14 = |300% * (6 -1) /(18-1)| = 88.23% = 88%;
as S14 = 88% < 90%, then S14 = 90%.

S15 = |300% * (10 -1) /(18-1)| = 158.82% = 159%

S16 = |300% * (1 -1) /(18-1)| = 0% = 0%;
as S16 = 0% < 90%, then S16 = 90%.

S17 = |300% * (11 -1) /(18-1)| = 176.47% = 176%

S18 = |300% * (8 -1) /(18-1)| = 123.52% = 124%

S19 = |300% * (10 -1) /(18-1)| = 158.82% = 159%

S20 = |300% * (18 -1) /(18-1)| = 300% = 300%

Using the information above we can generate HTML code like this (the line feeds were added just for readability purposes):

<a href="http://www.yanniel.info/search?q=linda+evangelista" rel="tag" style="font-size: 141%;">linda evangelista</a>

<a href="http://www.yanniel.info/search?q=toaster" rel="tag" style="font-size: 194%;">toaster</a>

<a href="http://www.yanniel.info/search?q=brad+richards" rel="tag" style="font-size: 106%;">brad richards</a>

<a href="http://www.yanniel.info/search?q=max+talbot" rel="tag" style="font-size: 212%;">max talbot</a>

<a href="http://www.yanniel.info/search?q=fireworks" rel="tag" style="font-size: 159%;">fireworks</a>

<a href="http://www.yanniel.info/search?q=library+of+congress" rel="tag" style="font-size: 194%;">library of congress</a>

<a href="http://www.yanniel.info/search?q=bohemian+grove" rel="tag" style="font-size: 247%;">bohemian grove</a>

<a href="http://www.yanniel.info/search?q=declaration+of+independence" rel="tag" style="font-size: 90%;">declaration of independence</a>

<a href="http://www.yanniel.info/search?q=17+day+diet" rel="tag" style="font-size: 265%;">17 day diet</a>

<a href="http://www.yanniel.info/search?q=independence+day" rel="tag" style="font-size: 159%;">independence day</a>

<a href="http://www.yanniel.info/search?q=white+sox" rel="tag" style="font-size: 90%;">white sox</a>

<a href="http://www.yanniel.info/search?q=blaise+pascal" rel="tag" style="font-size: 90%;">blaise pascal</a>

<a href="http://www.yanniel.info/search?q=ewan+mcgregor" rel="tag" style="font-size: 159%;">ewan mcgregor</a>

<a href="http://www.yanniel.info/search?q=kate+moss" rel="tag" style="font-size: 90%;">kate moss</a>

<a href="http://www.yanniel.info/search?q=princess+diana" rel="tag" style="font-size: 159%;">princess diana</a>

<a href="http://www.yanniel.info/search?q=traffic" rel="tag" style="font-size: 90%;">traffic</a>

<a href="http://www.yanniel.info/search?q=janet+jackson" rel="tag" style="font-size: 176%;">janet jackson</a>

<a href="http://www.yanniel.info/search?q=canada+day" rel="tag" style="font-size: 124%;">canada day</a>

<a href="http://www.yanniel.info/search?q=scott+pilgrim+vs.+the+world" rel="tag" style="font-size: 159%;">scott pilgrim vs. the world</a>

<a href="http://www.yanniel.info/search?q=paul+newman" rel="tag" style="font-size: 300%;">paul newman</a>

That HTML code renders a tag cloud like the one below:


Notice that if you click on a tag it will search any related content withing my blog. Try it!

Notes:
[1] A tag cloud is also referred as a word cloud or weighted list. In this context, tag is a synonym of term; sometimes even a synonym of word. Nevertheless, I don't like the latest assumption, because the practical experience shows that a tag can be formed using two words or more.
[2] You can chose whatever value you want for this parameter. However, depending on what you set, the appearance of the tags in the cloud might vary.

Configuring a Dynadot's domain for a Blogger's blog

In the very beginning, this blog was published on blogspot.com. The original Blog*Spot Address was something like this: subdomain.blogspot.com. At some point, I decided to publish this blog on my own domain and so I registered www.yanniel.info at Dynadot.

After registering my domain, I needed to configure both my Blogger and Dynadot (DNS) settings. This is how:

Configuring Dynadot settings:
  1. Log into your  Dynadot account using your username and password.
  2. Click the DOMAINS tab in the main menu. The main menu looks like this: SUMMARY | DOMAINS | SEARCH | WEB HOSTING | SSL | MY INFO| MESSAGES| MARKET PLACES| FORUMS.
  3. Mark the checkbox next to your domain name (in my case yanniel.info) and then click the "Set Name Servers" button in the the "Domain settings" section.
  4. In the new page, make sure you are located in the DNS tab menu. The menu looks like this: NAME SERVERS | PARKING | FORWARDING | STEALTH FORWARDING | DYNADOT HOSTING | DNS | FREE HOSTING | EMAIL FORWARDING.
  5. In the "Domain Record" section: select "Forward" in the "Record Type" combobox and write http://www.yourdomainname.ext (in my case http://www.yanniel.info) as your "IP Address or Target Host".
  6. In the "Subdomain Records" section: write www as your first "subdomain"; select "CNAME" in the "Record Type" combobox and write ghs.google.com as your first "IP Address or Target Host". This CNAME record value (ghs.google.com) is  particular to Blogger...so, if your are NOT using Blogger your should use the corresponding CNAME record. 
  7. Finally, click "Use Dynadot DNS" button.
Your setting should correspond to something like this:
Configuring a Dynadot's domain for a Blogger's blog

After your Dynadot settings are set, expect a delay of one to three days, before all the DNS servers have been updated. I suggest that you wait this time before proceeding to configure the Blogger settings.

Configuring Blogger settings:
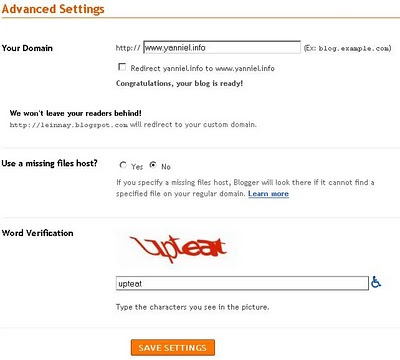
  1. Tell blogger to use your custom domain. For that go to: Dashboard-> Settings -> Publishing ---> Custom domain ---> Switch to advanced settings.
  2. Enter "Your Domain" name (in my case www.yanniel.info) and the captcha "Word Verification".
  3. Finally, click the "Save Settings" button.
 This is how it looks:
    Configure a custom domain in Blogger

      Well, this is all there is! Is your blog now alive in your custom domain? If it is, then I 'am happy ;-)

      For a more general guideline to configure a custom domain in Blogger refer to How do I use a custom domain name on my blog?