Showing posts with label Object-Oriented Programming. Show all posts

HMAC functions in Delphi (HMAC_SHA256, HMAC_SHA1)

I came across HMAC (Hash-based message authentication code) functions when developing a RESTful client application in Delphi. The RESTful Web Service API required me to send HMAC_SHA256 signatures (Base64 encoded) with each HTTP request.

HMAC functions take two parameters: a key and a message. The purpose of the HMAC function is to authenticate the message and guarantee the data integrity of the message.

The cryptographic strength of the HMAC function lies on the underlying hashing function that it uses: MD5, SHA1, SHA256, etc.

So, these functions are usually are termed HMAC_SHA256, HMAC_SHA1, HMAC_MD5 to connote the core hashing function being used.

The outcome of a HMAC function is basically an array of bytes, but it is usually represented as a hexadecimal string or encoded as a Base64 string. (The RESTful Web Service API needed the Base64 encoded output).

I Googled around for a bit, but I didn’t get a clean implementation of HMAC_SHA256 in Delphi (encoded as Base64). I glued together the pieces from some questions on StackOverflow and coded an Indy based implementation that uses generics to specify the core hashing function.

Brief description: I created a helper class called THMACUtils. Note that this class uses generics to indicate the hashing algorithm (TIdHMACSHA256, TIdHMACSHA1). Three functions are provided:  the main thing happens in the HMAC(...) function; HMAC_HexStr(...) and HMAC_Base64(...) are simply decorations of the output.

unit HMAC;

interface

uses
  System.SysUtils,
  EncdDecd,
  IdHMAC,
  IdSSLOpenSSL,
  IdHash;

type
  THMACUtils<T: TIdHMAC, constructor> = class
  public
    class function HMAC(aKey, aMessage: RawByteString): TBytes;
    class function HMAC_HexStr(aKey, aMessage: RawByteString): RawByteString;
    class function HMAC_Base64(aKey, aMessage: RawByteString): RawByteString;
  end;

implementation

class function THMACUtils<T>.HMAC(aKey, aMessage: RawByteString): TBytes;
var
  _HMAC: T;
begin
  if not IdSSLOpenSSL.LoadOpenSSLLibrary then Exit;
  _HMAC:= T.Create;
  try
    _HMAC.Key := BytesOf(aKey);
    Result:= _HMAC.HashValue(BytesOf(aMessage));
  finally
    _HMAC.Free;
  end;
end;

class function THMACUtils<T>.HMAC_HexStr(aKey, aMessage: RawByteString): RawByteString;
var
  I: Byte;
begin
  Result:= '0x';
  for I in HMAC(aKey, aMessage) do
    Result:= Result + IntToHex(I, 2);
end;

class function THMACUtils<T>.HMAC_Base64(aKey, aMessage: RawByteString): RawByteString;
var
  _HMAC: TBytes;
begin
  _HMAC:= HMAC(aKey, aMessage);
  Result:= EncodeBase64(_HMAC, Length(_HMAC));
end;

end.

Below there’s an example of how to use the THMACUtils class.

program HMACSample;

{$APPTYPE CONSOLE}

{$R *.res}

uses
  System.SysUtils,
  HMAC,
  IdHMACSHA1,
  IdHashMessageDigest;

begin
  try
    Write('HMAC_SHA1("key", "message")'#9#9'= ');
    Writeln(THMACUtils<TIdHMACSHA1>.HMAC_HexStr('key', 'message' ));
    Writeln;

    Write('HMAC_SHA256("key", "message")'#9#9'= ');
    Writeln(THMACUtils<TIdHMACSHA256>.HMAC_HexStr('key', 'message' ));
    Writeln;

    Write('HMAC_SHA1_Base64("key", "message")'#9'= ');
    Writeln(THMACUtils<TIdHMACSHA1>.HMAC_Base64('key', 'message' ));
    Writeln;

    Write('HMAC_SHA256_Base64("key", "message")'#9'= ');
    Writeln(THMACUtils<TIdHMACSHA256>.HMAC_Base64('key', 'message' ));

    Readln;

  except
    on E: Exception do
      Writeln(E.ClassName, ': ', E.Message);
  end;
end.

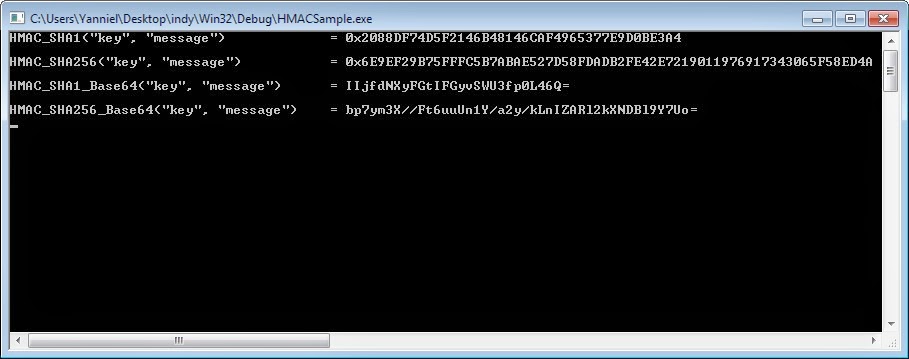
The console application above looks like this:

HMAC Sample Application Delphi

Refactoring to patterns. Yet another TDD example coded in Delphi

Long overdue here is my second article about Test Driven Development (TDD) in Delphi. This is a continuation of TDD in Delphi: The Basics, another post that I wrote a few months earlier. 

I would like to focus in a particular step within the TDD cycle: refactoring the code. Refactoring means optimizing, cleaning, shortening, beautifying, styling (put your own word here) the code without breaking the functionality; that is, without breaking your unit tests.
 
By having unit tests in place before refactoring, you guarantee that the changes to the code are safe. Refactoring can introduce bugs. To avoid those bugs you need your unit tests in place.

Refactoring can introduce something else: refactoring can introduce design patterns into your code. That means you don’t have to introduce the design patterns up-front, since your code can evolve from a “very rustic implementation” to a “pattern oriented implementation”. This is referred as “refactoring to patterns”. If you are interested on the topic, I advise you to read Refactoring To Patterns by Joshua Kerievsky.

I’ll take the chess game as the base to my example. For simplicity, I’ll just refer to a couple of pieces: the knight and the bishop. In this example, I will just focus in refactoring some code with unit tests already in place. A detailed walk-through for the TDD cycle can be found in my previous article, which is also based on the chess game.  
  
The code is easy enough to be self-explanatory: basically, there is a class hierarchy in which TPiece is the base class from which TKnight and TBishop derive. Take a quick look:

unit ChessGame;

interface

type

 TPiece = class
 private
   FX,
   FY: Byte;
 public
   constructor Create(aX, aY: Integer);
   function IsWithinBoard(aX, aY: Integer): Boolean;
 end;

 TBishop = class (TPiece)
 public
   function CanMoveTo(aX, aY: Byte): Boolean;
   function isValidMove(aX, aY: Byte): Boolean;
 end;

 TKnight = class(TPiece)
  public
    function CanMoveTo(aX, aY: Byte): Boolean;
    function isValidMove(aX, aY: Byte): Boolean;
 end;


implementation

{ TPiece }

constructor TPiece.Create(aX, aY: Integer);
begin
  inherited Create;
  // TODO: check that this assignment is valid.
  // Not now, ok? :-)
  FX:= aX;
  FY:= aY;
end;

function TPiece.IsWithinBoard(aX, aY: Integer): Boolean;
begin
  Result:= (aX > 0) and
           (aX < 9) and
           (aY > 0) and
           (aY < 9);
end;

{ TKnight }

function TKnight.isValidMove(aX, aY: Byte): Boolean;
var
  x_diff,
  y_diff: Integer;
begin
  x_diff:= abs(aX - FX) ;
  y_diff:= abs(aY - FY) ;

  Result:= ((x_diff = 2) and (y_diff = 1))
                         or
           ((y_diff = 2) and (x_diff = 1));
end;

function TKnight.CanMoveTo(aX, aY: Byte): Boolean;
begin
  Result:= IsWithinBoard(aX, aY) and
           IsValidMove(aX, aY);
end;

{ TBishop }

function TBishop.isValidMove(aX, aY: Byte): Boolean;
begin
  Result:= abs(aX - FX) = abs(aY - FY);
end;

function TBishop.CanMoveTo(aX, aY: Byte): Boolean;
begin
  Result:= IsWithinBoard(aX, aY) and
           IsValidMove(aX, aY);
end;

end. 


/////////////////////////////////////////////

 
unit TestChessGame;

interface

uses
  TestFramework, ChessGame;

type
  // Test methods for class TPiece
  TestTPiece = class(TTestCase)
  strict private
    FPiece: TPiece;
  public
    procedure SetUp; override;
    procedure TearDown; override;
  published
    procedure TestIsWithinBoard;
  end;

  // Test methods for class TBishop
  TestTBishop = class(TTestCase)
  strict private
    FBishop: TBishop;
  public
    procedure SetUp; override;
    procedure TearDown; override;
  published
    procedure TestCanMoveTo;
    procedure TestisValidMove;
  end;

  // Test methods for class TKnight
  TestTKnight = class(TTestCase)
  strict private
    FKnight: TKnight;
  public
    procedure SetUp; override;
    procedure TearDown; override;
  published
    procedure TestCanMoveTo;
    procedure TestisValidMove;
  end;

implementation

procedure TestTPiece.SetUp;
begin
  FPiece := TPiece.Create(4, 4);
end;

procedure TestTPiece.TearDown;
begin
  FPiece.Free;
  FPiece := nil;
end;

procedure TestTPiece.TestIsWithinBoard;
begin
  //Test trivial (normal) workflow
  Check(FPiece.IsWithinBoard(4, 4));

  //Tests boundaries
  Check(FPiece.IsWithinBoard(1, 1));
  Check(FPiece.IsWithinBoard(1, 8));
  Check(FPiece.IsWithinBoard(8, 1));
  Check(FPiece.IsWithinBoard(8, 8));

  //Test beyond the boundaries
  CheckFalse(FPiece.IsWithinBoard(3, 15));
  CheckFalse(FPiece.IsWithinBoard(3, -15));
  CheckFalse(FPiece.IsWithinBoard(15, 3));
  CheckFalse(FPiece.IsWithinBoard(15, 15));
  CheckFalse(FPiece.IsWithinBoard(15, -15));
  CheckFalse(FPiece.IsWithinBoard(-15, 3));
  CheckFalse(FPiece.IsWithinBoard(-15, 15));
  CheckFalse(FPiece.IsWithinBoard(-15, -15));
end;

procedure TestTBishop.SetUp;
begin
  FBishop := TBishop.Create(4, 4);
end;

procedure TestTBishop.TearDown;
begin
  FBishop.Free;
  FBishop := nil;
end;

procedure TestTBishop.TestCanMoveTo;
begin
  // Hey developer, indulge me here: believe
  // that I fully wrote the code for this
  // test already before writing anything else.
end;

procedure TestTBishop.TestisValidMove;
begin
  // Hey developer, indulge me here: believe
  // that I fully wrote the code for this
  // test already before writing anything else.
end;

procedure TestTKnight.SetUp;
begin
  FKnight := TKnight.Create(4, 4);
end;

procedure TestTKnight.TearDown;
begin
  FKnight.Free;
  FKnight := nil;
end;

procedure TestTKnight.TestCanMoveTo;
begin
  // Hey developer, indulge me here: believe
  // that I fully wrote the code for this
  // test already before writing anything else.
end;

procedure TestTKnight.TestisValidMove;
begin
  // Hey developer, indulge me here: believe
  // that I fully wrote the code for this
  // test already before writing anything else.
end;

initialization
  // Register any test cases with the test runner
  RegisterTest(TestTPiece.Suite);
  RegisterTest(TestTBishop.Suite);
  RegisterTest(TestTKnight.Suite);
end.


Note that the method CanMoveTo is duplicated in both TKnight  and TBishop; that’s not nice isn’t it? In order to fix this, we can pull-up the CanMoveTo method to the TPiece base class. Note this now: the CanMoveTo has now become a “template method”; because is a general algorithm applicable to all kind of chess pieces (TKnight ,TBishop, etc) .

This general algorithm has deferred some steps to be implemented in the subclasses; I mean, the isValidMove method is still coded in the subclasses. Isn’t this a beauty?  You have now refactored your code and when doing so, you have introduced the Template Method Design Pattern.

What’s even best, (don’t forget this because it is a key part): is that we can guarantee that our fancy refactoring didn’t break our pre-existing functionality. Why? Because we had unit tests in place written a long time ago. Writing unit test from the beginning gives a huge peace of mind to the developer :-) See the new refactored code below:

unit ChessGameRefactored;

interface

type

 TPiece = class
 private
   FX,
   FY: Byte;
 public
   constructor Create(aX, aY: Integer);
   function IsWithinBoard(aX, aY: Integer): Boolean;

   function CanMoveTo(aX, aY: Byte): Boolean;
   function isValidMove(aX, aY: Byte): Boolean; virtual; abstract;
 end;

 TBishop = class (TPiece)
 public
   function isValidMove(aX, aY: Byte): Boolean; override;
 end;

 TKnight = class(TPiece)
  public
    function isValidMove(aX, aY: Byte): Boolean; override;
 end;


implementation

{ TPiece }

constructor TPiece.Create(aX, aY: Integer);
begin
  inherited Create;
  // TODO: check that this assignment is valid.
  // Not now, ok? :-)
  FX:= aX;
  FY:= aY;
end;

function TPiece.IsWithinBoard(aX, aY: Integer): Boolean;
begin
  Result:= (aX > 0) and
           (aX < 9) and
           (aY > 0) and
           (aY < 9);
end;

function TPiece.CanMoveTo(aX, aY: Byte): Boolean;
begin
  Result:= IsWithinBoard(aX, aY) and
           IsValidMove(aX, aY);
end;

{ TKnight }

function TKnight.isValidMove(aX, aY: Byte): Boolean;
var
  x_diff,
  y_diff: Integer;
begin
  x_diff:= abs(aX - FX) ;
  y_diff:= abs(aY - FY) ;

  Result:= ((x_diff = 2) and (y_diff = 1))
                         or
           ((y_diff = 2) and (x_diff = 1));
end;

{ TBishop }

function TBishop.isValidMove(aX, aY: Byte): Boolean;
begin
  Result:= abs(aX - FX) = abs(aY - FY);
end;

end.

Conclusion, in addition to all the cool things of TDD there’s the possibility of refining your design not up-front, but when refactoring your code. Design patterns can be introduced at any time and we know that such introduction, if late, is not going to break our logic, because we have unit tests in place to prevent that from happening.

Some related reading below:

Deep copying (cloning) objects in Delphi

When I first took a look at the prototype design pattern in GoF(years ago), I realized that there was a big obstacle (challenge) to implement it in Delphi: How to write a routine to really clone (not just recreate) an object? In other words, how to perform a deep-copy of a living object in Delphi.

There are approaches out there mimicking the deep copy by simply calling the constructor and reassigning the state of the object by hand (I don’t like it). There are others exposing that a deep copy could be accomplished for the descendants of TPersistent by calling the Assign method (I don’t like it either).

With the new RTTI extensions it seemed to me (and to others) that a deep copy could be accomplished using reflection.

I was reluctant to write the routine myself since the work is not trivial. It could get really nasty because there might be composition, aggregation and God knows what within an arbitrary object.

So I waited….

Just a few days ago, I realized that I could use the JSON marshalling and unmarshalling features introduced in Delphi (2010?) to write the deep copy method. So I came with this:

.....

uses
  DBXJSON, DBXJSONReflect;
.....
 

function DeepCopy(aValue: TObject): TObject;
var
  MarshalObj: TJSONMarshal;
  UnMarshalObj: TJSONUnMarshal;
  JSONValue: TJSONValue;
begin
  Result:= nil;
  MarshalObj := TJSONMarshal.Create;
  UnMarshalObj := TJSONUnMarshal.Create;
  try
    JSONValue := MarshalObj.Marshal(aValue);
    try
      if Assigned(JSONValue) then
        Result:= UnMarshalObj.Unmarshal(JSONValue);
    finally
      JSONValue.Free;
    end;
  finally
    MarshalObj.Free;
    UnMarshalObj.Free;
  end;
end;

You can now use it like this:

.....

var
  MyObject1,
  MyObject2: TMyObject;
begin
  //Regular object construction
  MyObject1:= TMyObject.Create;

  //Deep copying an object
  MyObject2:= TMyObject(DeepCopy(MyObject1));

  try
    //Do something here

  finally
    MyObject1.Free;
    MyObject2.Free;
  end;
end;

I tested it with some complex cases and it seems to be working quite well. Anyhow, if you find any problems or limitations, please, let me know.

Now that you get the idea we can do more crazy things like patching TObject (or any other class hierarchy) by using helpers. Look at this:

.....

interface

uses
   DBXJSON, DBXJSONReflect;

type
  TObjectHelper = class helper for TObject
    function Clone: TObject;
  end;

implementation

function TObjectHelper.Clone: TObject;
var
  MarshalObj: TJSONMarshal;
  UnMarshalObj: TJSONUnMarshal;
  JSONValue: TJSONValue;
begin
  Result:= nil;
  MarshalObj := TJSONMarshal.Create;
  UnMarshalObj := TJSONUnMarshal.Create;
  try
    JSONValue := MarshalObj.Marshal(Self);
    try
      if Assigned(JSONValue) then
        Result:= UnMarshalObj.Unmarshal(JSONValue);
    finally
      JSONValue.Free;
    end;
  finally
    MarshalObj.Free;
    UnMarshalObj.Free;
  end;
end;

All of a sudden, TObject has a Clone method! Call it like this:

.....

var
  MyObject1,
  MyObject2: TMyObject;
begin
  //Regular object construction
  MyObject1:= TMyObject.Create;

  //Cloning an object
  MyObject2:= TMyObject(MyObject1.Clone);

  try
    //Do something here

  finally
    MyObject1.Free;
    MyObject2.Free;
  end;
end;

If you think that helpers are an aberration, you can still create a TCloneable class with a Clone method and inherit from it, right? You can even use the decorator pattern to attach a Clone method to an object. You can do more…Share it with me, please. Thanks!

String comparison in Delphi

Have you ever wondered how utilities like Beyond Compare or DIFF are comparing files? They do it (I guess) by solving the longest common subsequence (LCS) problem.

After reading the Wikipedia article linked above, I obtained an overall view of the problem and I looked at the possible resolutions. So, I decided to implement a Delphi class to do the string comparison trick, which is the base for the text file comparison.

Let me put it as follows: given two strings to be compared, I want to highlight in blue the characters added to the first string and in red the characters removed from it. The common (unchanged) characters will keep the default color.
 
For example:

String 1 = Delphi allows both structural and object oriented programming.

String 2 = Does Delphi allow object oriented programming?

Highlighted differences:

Does Delphi allows both structural and object oriented programming.?

The Delphi class looks like this:

type
  TDiff = record
    Character: Char;
    CharStatus: Char;  //Possible values: [+, -, =]
  end;

  TStringComparer = class
  ……………
  public
    class function Compare(aString1, aString2: string): TList<TDiff>;
  end;

When you call TStringComparer.Compare, a generic list of TDiff records is created. A TDiff record contains a character and whether this character was added (CharStatus = ‘+’), removed (CharStatus = ‘-’) or unchanged (CharStatus = ‘=’) in both strings under comparison.

Let’s drop two edits (Edit1, Edit2), a rich edit (RichEdit1) and a button (Button1) on a Delphi form. To highlight the differences put the following code in the OnClick event of the button:

procedure TForm1.Button1Click(Sender: TObject);
var
  Differences: TList<TDiff>;
  Diff: TDiff;
begin
  //Yes, I know...this method could be refactored ;-)
  Differences:= TStringComparer.Compare(Edit1.Text, Edit2.Text);
  try
    RichEdit1.Clear;
    RichEdit1.SelStart:= RichEdit1.GetTextLen;
    for Diff in Differences do
      if Diff.CharStatus = '+' then
      begin
        RichEdit1.SelAttributes.Color:= clBlue;
        RichEdit1.SelText := Diff.Character;
      end
      else if Diff.CharStatus = '-' then
      begin
        RichEdit1.SelAttributes.Color:= clRed;
        RichEdit1.SelText:= Diff.Character;
      end
      else
      begin
        RichEdit1.SelAttributes.Color:= clDefault;
        RichEdit1.SelText:= Diff.Character;
      end;
  finally
    Differences.Free;
  end;
end;

It looks like in the image below:


For the full implementation read further down. Note that various optimizations could be added to the code below, but I didn’t implement them. Anyway, I hope this helps. Feedback is welcome! Feel free to find and correct bugs ;-)

Multiton Design Pattern in Delphi

The multiton is somewhat an extension of the singleton pattern. It is referred as registry of singletons by the GOF. I don’t know for sure who appointed the name multiton: it’s an analogy derived from the term singleton. So, singleton = single + ton; while multiton = multi + ton.

The singleton pattern guarantees that a class has only one instance; while the multiton allows keeping multiple instances by maintaining a map of related keys and unique objects.  Note that there can be only one instance per key when implementing the multiton pattern. Also, note that the key does not have to be a string value; it can be an object for example. Nonetheless, in our code sniped we will consider the key to be a string.

I am going to tweak my singleton class implementation so that I can make it a multiton instead:

unit Multiton;

interface

uses
  Generics.Collections;

type
  TMultiton = class
  private
    //Private fields and methods here...

     class var _registry: TDictionary<string, TMultiton>;
  protected

  public
    class function Create(aName: string): TMultiton;
    class destructor Destroy;
    class function Lookup(aName: string): TMultiton;
  
    destructor Destroy; override;

    //Other public methods and properties here...  
  end;

implementation

{ TMultiton }

class function TMultiton.Create(aName: string): TMultiton;
begin
  if not Assigned(_registry) then
    _registry:= TDictionary<string, TMultiton>.Create;

  if not _registry.TryGetValue(aName, Result) then
  begin
    Result:= inherited Create as Self;
    _registry.Add(aName, Result);
  end;
end;

class destructor TMultiton.Destroy;
begin
   if Assigned(_registry) then
   begin
     _registry.Values.ToArray[0].Free;     
   end;
end;

class function TMultiton.Lookup(aName: string): TMultiton;
begin
  if Assigned(_registry) then
    _registry.TryGetValue(aName, Result);
end;

destructor TMultiton.Destroy;
var
  _instance: TMultiton;
  ValuesArray: TArray<TMultiton>;         
begin
  if Assigned(_registry) then
  begin
    ValuesArray:= _registry.Values.ToArray;

    _registry.Clear;
    _registry.Free;
    _registry:= nil;

    for _instance in  ValuesArray do
      if _instance <> Self then
        _instance.Free;
  end;

  inherited;
end;

end.

A few things I want you to note:
  • Instead of a single instance, we are holding a registry of instances. We do so by introducing the class variable _registry of type TDictionary<string, TMultiton>.  
  • We register (create) the different instances by calling the class function Create. This function gets the key name as a parameter. A new instance is only created if no matches to the key name are found in the dictionary. If a match is found, then the corresponding value is returned from the dictionary data structure.
  • The Lookup class function allows retrieving a particular instance by giving its key name. Note that the Create function can also be used for this purpose, but it feels more natural to call Lookup for the searches, and Create for the registration (creation) of instances.
  • We have provided a regular destructor that once invoked releases all the memory: not only the current multiton instance, but the whole registry.    
  • We have also provided a class destructor in case that we forget to manually release the memory.  
This code was compiled with Delphi XE2, but it should also work for all versions above Delphi 2009. Comments, corrections and suggestions are most welcome.

Consider reading these books about design patterns if you haven’t yet:

Dependency Injection in Delphi: a simple example

I want to give a fairly simple Delphi example that will expose the dependency injection pattern. No framework, no third-party library will be needed here: just plain Delphi code.

I won’t dig into the different forms of dependency injection. I will explain the idea of the pattern as simple as possible.

Instead of giving you bunch of definitions, I will present you with some code. The need to inject a dependency will come naturally. You’ll see:

type
  IDependency = interface
  ['{618030A2-DB17-4532-81D0-D5AA6F73DC66}']
    procedure GetType;
  end;

  TDependencyA = class(TInterfacedObject, IDependency)
  public
    procedure GetType;
  end;

  TDependencyB = class(TInterfacedObject, IDependency)
  public
    procedure GetType;
  end;

 TConsumer = class
  private
    FDependency: IDependency;
  public
    constructor Create(aDependencyClassName: string);
    procedure GetDependencyType;
  end;

implementation


{ TDependencyA }

procedure TDependencyA.GetType;
begin
  WriteLn('Instance of type TDependencyA');
end;

{ TDependencyB }

procedure TDependencyB.GetType;
begin
  WriteLn('Instance of type TDependencyB');
end;

{ TConsumer }

constructor TConsumer.Create(aDependencyClassName: string);
begin
  if aDependencyClassName = 'TDependencyA'  then
    FDependency:= TDependencyA.Create
  else if aDependencyClassName = 'TDependencyB'  then
    FDependency:= TDependencyB.Create;
end;

procedure TConsumer.GetDependencyType;
begin
  if FDependency <> nil then
    FDependency.GetType;
end;

It is a good and recommended practice in OOP to decrease coupling as much as possible. This means that each component (class) should avoid knowing implementation details of the other components (classes).

In our example, the TConsumer class has a dependency of type IDependency. So far so good, since we are abstracting any implementation specifics by using an interface (contract). The problem becomes obvious when you take a look at the constructor of TConsumer.

TConsumer.Create is instantiating the concrete classes TDependencyA   or TDependencyB depending on the string parameter aDependencyClassName. As you can see, the design is not well decupled here, because the consumer class (TConsumer) is hard-coding implementation details about its dependency.  

The question is: can we decuple this design even more? Yes, the dependency injection pattern will do it for us.

It’s now time to refactor our code a little bit. We’ll start by changing the signature of the constructor of the TConsumer class:

constructor TConsumer.Create(aDependency: IDependency);
begin
  FDependency:= aDependency;
end;

Instead of choosing the concrete dependency to instantiate within the constructor, we are now injecting the dependency trough the aDependency parameter. Now the class TConsumer is completely independent of the dependency concrete class.

Ok, ok, but we still need to create the concrete dependency instance somewhere, right? Yes, we do. For that we will create a new class TDependencyInjector whose only purpose is to return the right dependency instance. This class will use reflection in order to create the right instance of IDependency. It will use just a string parameter that contains the dependency class name.

uses
  RTTI,
  Dependencies;

type
  TDependencyInjector =  class
  public
    class function GetDependency(aDependencyClassName: string): IDependency;
  end;

implementation

{ TDependencyInjector }

class function TDependencyInjector.GetDependency(aDependencyClassName: string): IDependency;
var
  RttiContext: TRttiContext;
  RttiType: TRttiInstanceType;
begin
  RttiType := RttiContext.FindType(aDependencyClassName) as TRttiInstanceType;
  if RttiType <> nil then
    Result:= RttiType.GetMethod('Create').Invoke(RttiType.MetaclassType, []).AsInterface as IDependency;
end;

Finally, let's put all the pieces together. Consider this console application that puts all the pieces in place:

program DependencyInjection;

{$APPTYPE CONSOLE}

{$R *.res}

uses
...

var
  SomeConsumerObj: TConsumer;
  Dependency: IDependency;

begin
  Dependency:= TDependencyInjector.GetDependency('Dependencies.TDependencyA');
  //Dependency:= TDependencyInjector.GetDependency('Dependencies.TDependencyB');
  SomeConsumerObj:= TConsumer.Create(Dependency);

  try
    SomeConsumerObj.GetDependencyType;
  finally
    SomeConsumerObj.Free;
  end;

  Readln;
end.

In the code above we get the Dependency instance at runtime by using the TDependencyInjector class. Then we inject that dependency using the constructor of the class  TConsumer. We have got a more decoupled design by using dependency injection. Don't you agree? ;-)

Get the full source code of this example here (written in Delphi XE 2).

Decorator Design Pattern in Delphi. Multiple Decorations

In my previous post I introduced the decorator design pattern to you. I used a fairly simple example (a silly example if you wish) in order to give you a flavour of the pattern. I wrote Delphi code for that matter and I focused in having ONE, and only ONE, decorator class.

This was the situation in the original example: we implemented a TConsole class with a Write method that writes a text to the standard output. Then, we used a TUpperCaseConsole class to decorate a TConsole object. The decoration itself was simple: uppercasing the text to be shown.

Now I want to add a second decoration, which is framing the text to be shown within a rectangle of asterisks (*). For that I will create a new decorator class: TFramedConsole.

Let’s present a raw piece of code: (We will refine and refactor the code later)

var
  MyConsole: TConsole;
begin
  MyConsole:= TConsole.Create;
  MyConsole:= TUpperCaseConsole.Create(MyConsole); //first decoration
  MyConsole:= TFramedConsole.Create(MyConsole); //second decoration

  try
    MyConsole.Write('Hello World!');
  finally
    MyConsole.Free;
  end;
  Readln;
end.

In the code above we added a second decoration. The output for that code should be something like this:

**********************
**   HELLO WORLD!   **
**********************

This is cool: We can even add the same decoration several times. For example, to provide a double frame we would do something like this:

var
  MyConsole: TConsole;
begin
  MyConsole:= TConsole.Create;
  MyConsole:= TUpperCaseConsole.Create(MyConsole); //first decoration
  MyConsole:= TFramedConsole.Create(MyConsole); //second decoration
  MyConsole:= TFramedConsole.Create(MyConsole); //third decoration

  try
    MyConsole.Write('Hello World!');
  finally
    MyConsole.Free;
  end;
  Readln;
end

Can you guess the output now? It’s like this:

**********************
**********************
**   HELLO WORLD!   **
**********************
**********************

How are the decorated and decorator classes put together when multiple decorations are needed? There are two key things to remember:
  1. The different concrete decorators (TUpperCaseConsole and TFramedConsole) must inherit from a base decorator class. We will introduce the TDecoratedConsole class as the common ancestor for our decorators.
  2. The base decorator class forwards the calls to its Write method to the decorated object’s Write method.
The code looks like this:

interface

uses
  SysUtils, Windows;

type
  TConsole = class
  private
    FText: string;
  public
    procedure Write(aText: string); virtual;
  end;

  TDecoratedConsole = class(TConsole) //Base Decorator
  private
    FConsole: TConsole;
  public
    constructor Create(aConsole: TConsole);
    destructor Destroy; override;

    procedure Write(aText: string); override;
  end;

  TUpperCaseConsole = class(TDecoratedConsole) //Concrete Decorator
  public
    procedure Write(aText: string); override;
  end;

  TFramedConsole = class(TDecoratedConsole) //Concrete Decorator
  private
    procedure CreateFrame(var aText: string);
  public
    procedure Write(aText: string); override;
end;

implementation

{ TConsole }

procedure TConsole.Write(aText: string);
begin
  FText:= aText;
  Writeln(FText);
end;

{ TDecoratedConsole }

constructor TDecoratedConsole.Create(aConsole: TConsole);
begin
  inherited Create;
  FConsole:= aConsole;
end;

destructor TDecoratedConsole.Destroy;
begin
  FConsole.Free;
  inherited;
end;

procedure TDecoratedConsole.Write(aText: string);
begin
  FConsole.Write(aText);
end;

{ TUpperCaseConsole }

procedure TUpperCaseConsole.Write(aText: string);
begin
  aText:= UpperCase(aText);
  inherited Write(aText);
end;

{ TFramedConsole }

procedure TFramedConsole.CreateFrame(var aText: string);
var
  TextLength: Integer;
  AsteriskLine: string;
  RealText: string;
begin
  if Pos('*', aText) = 0 then
    aText:= '** ' + aText + ' **';

  RealText:= Trim(StringReplace(aText, '*', '', [rfReplaceAll]));
  TextLength:= Length(RealText);
  AsteriskLine:= StringOfChar('*', TextLength + 10);

  aText:= AsteriskLine + #13#10 +
          aText + #13#10 + AsteriskLine;
end;

procedure TFramedConsole.Write(aText: string);
begin
  CreateFrame(aText);
  inherited Write(aText);
end;

I know you are dying to say: the code above is awful because the decorators are bounded to a specific implementation of the decorated class. Indeed, we are going to fix that by introducing a TAbstractConsole class, which will be the common ancestor of the decorated and decorator classes. The TAbstractConsole class is abstract, meaning it has no implementation. You could have used an Interface type instated, something like IAbstractConsole. I’ll leave that to you.

Finally, I present you the consuming code plus the class definition code:

//Consuming code
var
  MyConsole: TAbstractConsole;
begin
  MyConsole:= TConsole.Create;
  MyConsole:= TUpperCaseConsole.Create(MyConsole); //first decoration
  MyConsole:= TFramedConsole.Create(MyConsole); //second decoration
  MyConsole:= TFramedConsole.Create(MyConsole); //third decoration

  try
    MyConsole.Write('Hello World!');
  finally
    MyConsole.Free;
  end;
  Readln;
end

//Class definition code
interface

uses
  SysUtils, Windows;

type
  TAbstractConsole = class //Abstract class ==> Interface
  public
    procedure Write(aText: string); virtual; abstract;
  end;

  TConsole = class(TAbstractConsole) //Concrete class
  private
    FText: string;
  public
    procedure Write(aText: string); override;
  end;

  TDecoratedConsole = class(TAbstractConsole) //Base Decorator
  private
    FConsole: TAbstractConsole;
  public
    constructor Create(aConsole: TAbstractConsole);
    destructor Destroy; override;

    procedure Write(aText: string); override;
  end;

  TUpperCaseConsole = class(TDecoratedConsole) //Concrete Decorator
  public
    procedure Write(aText: string); override;
  end;

  TFramedConsole = class(TDecoratedConsole) //Concrete Decorator
  private
    procedure CreateFrame(var aText: string);
  public
    procedure Write(aText: string); override;
  end;

implementation

{ TConsole }

procedure TConsole.Write(aText: string);
begin
  FText:= aText;
  Writeln(FText);
end;

{ TDecoratedConsole }

constructor TDecoratedConsole.Create(aConsole: TAbstractConsole);
begin
  inherited Create;
  FConsole:= aConsole;
end;

destructor TDecoratedConsole.Destroy;
begin
  FConsole.Free;
  inherited;
end;

procedure TDecoratedConsole.Write(aText: string);
begin
  FConsole.Write(aText);
end;

{ TUpperCaseConsole }

procedure TUpperCaseConsole.Write(aText: string);
begin
  aText:= UpperCase(aText);
  inherited Write(aText);
end;

{ TFramedConsole }

procedure TFramedConsole.CreateFrame(var aText: string);
var
  TextLength: Integer;
  AsteriskLine: string;
  RealText: string;
begin
  if Pos('*', aText) = 0 then
    aText:= '** ' + aText + ' **';

  RealText:= Trim(StringReplace(aText, '*', '', [rfReplaceAll]));
  TextLength:= Length(RealText);
  AsteriskLine:= StringOfChar('*', TextLength + 10);

  aText:= AsteriskLine + #13#10 +
          aText + #13#10 + AsteriskLine;
end;

procedure TFramedConsole.Write(aText: string);
begin
  CreateFrame(aText);
  inherited Write(aText);
end;

I hope this was useful and I am definitely waiting for you feedback. Corrections and suggestions are welcome in the comment section below. Thanks!

For further reading about design patterns get your hands on these classics:

Decorator Design Pattern in Delphi. Single decoration

Decorator (also referred as Wrapper) is classified by GoF as a structural pattern. Its purpose is to:

“Attach additional responsibilities to an object dynamically. Decorators provide a flexible alternative to subclassing for extending functionality.”  

Both inheritance and the decorator pattern aim towards extending the functionality. This is what they have in common.

There are a couple of remarkable differences:
  • Inheritance extends the functionality at compilation time (statically). The decorator pattern extends the functionality at runtime (dynamically).
  • Inheritance extends the functionality of a whole class (all objects of the extended class get the extended functionality). The decorator pattern allows extending the functionality of a selected object (or group of objects) without affecting the remaining objects.  

You can think of the decorator pattern as a way to add make-up to an object or even as a way to attach accessories to that object. All this is done on the fly after the object itself has been created.

Let’s walk through a simple task to get the idea. This example might sound silly. I want it silly so that you can focus on the decorator implementation, avoiding any extra complexity.

Please, be aware that this design is somewhat unfinished, since we are only covering the case for a single decoration (just one functionality to be extended). In real life, we will need multiple decorators in order to add multiple responsibilities. As this is a controlled example (just for the purpose of this discussion), I am enforcing that only ONE responsibility is going to be extended. This means, we will have ONE decorator class. Because of that, I have made some simplifications to the design; so that you get a taste of the decorator pattern in its simplest expression.

Later on, in other post, we’ll see how to add multiple responsibilities (with multiple decorator classes). For that, we’ll need a more complex design to overcome the shortcomings of this initial example. For now, just get the idea...we'll come back later to the multiple decorations scenario.

If you get some time, take a look at the discussion in the comments section.

Subtask 1: Let’s create a TConsole class which purpose is to output a given text to the standard output. The code might be something like this:

interface
type
  TConsole = class
  public
    procedure Write(aText: string);
  end;

implementation

procedure TConsole.Write(aText: string);
begin
  Writeln(aText);
end;

Subtask 2: Let’s use the TConsole class to printout “Hello World!”. The following code snipped does it:

var
  MyConsole: TConsole;
begin
  MyConsole:= TConsole.Create;
  try
    MyConsole.Write('Hello World!');
  finally
    MyConsole.Free;
  end;
  Readln;
end.

This is how the output looks like:

Hello World!

Subtask 3: Now, let’s decorate the object referenced by MyConsole (only that object, not the whole class). What I want is to upper case every text to be printed out. We need to define a decorator class TUpperCaseConsole for that purpose. See the code:

interface

uses
  SysUtils;

type
  TConsole = class
  public
    procedure Write(aText: string); virtual;
  end;


  //Decorator
  TUpperCaseConsole = class(TConsole)
  private
    FConsole: TConsole;
  public
    constructor Create(aConsole: TConsole);
    destructor Destroy; override;

    procedure Write(aText: string); override;
  end;

implementation

{ TConsole }

procedure TConsole.Write(aText: string);
begin
  Writeln(aText);
end;

{ TUpperCaseConsole }

constructor TUpperCaseConsole.Create(aConsole: TConsole);
begin
  inherited Create;
  FConsole:= aConsole;
end;

destructor TUpperCaseConsole.Destroy;
begin
  FConsole.Free;
  inherited;
end;

procedure TUpperCaseConsole.Write(aText: string);
begin
  aText:= UpperCase(aText);
 
FConsole.Write(aText);
end;

Notice in the code above that the decorator class (TUpperCaseConsole) inherits from the decorated class (TConsole). This makes both the decorated and the decorator objects to share the same public interface. Furthermore, the TUpperCaseConsole class Has-A field of the TConsole type. We’ll use this field to forward the printing functionality to the TConsole class, once we have applied the cosmetic (upper case transformation) to the text.

Subtask 4: Let’s now create some consuming code to decorate one TConsole object on the fly. Note how the TUpperCaseConsole constructor wraps (decorates) the object referenced by MyConsole.

var
  MyConsole: TConsole;
begin
  MyConsole:= TConsole.Create;
  MyConsole:= TUpperCaseConsole.Create(MyConsole);
  try
    MyConsole.Write('Hello World!');
  finally
    MyConsole.Free;
  end;
  Readln;
end.

This is how the output looks like after the decorator has been applied:

HELLO WORLD!  

In real life, you’ll have to judge whether the decorator pattern is the best alternative to be applied to solve a particular problem. Not always it the right way to go with. For more details get your hands on these classic books.

Anonymous Methods in Delphi

Under the scope of Delphi, an anonymous method is either a procedure or function that’s unattached to an identifier. In other words, anonymous methods don’t have names, which is why they are called “anonymous”.

Basically, you can assign a block of code (in the form of a procedure or function) directly to a variable.

I am going to give you a simplistic example. I am going to Keep it simple, Stupid! to avoid distracting you with any complexity.

This is the wording of the task: create a console application which prints “Hello world” and “Good bye” to the standard output. Constraint: use the Writeln function just once in the code.

To accomplish such reckless task in the old days (before the introduction of anonymous methods) you could do this:

program Project1;

{$APPTYPE CONSOLE}

procedure PrintString(aText: string);
begin
 Writeln(aText);
end;

begin
  PrintString('Hello world');
  PrintString('Good bye');
  Readln;
end.

How to do the same with anonymous methods? Take a look at the following code:

program Project1;

{$APPTYPE CONSOLE}

type
  TMyAnonymousProcedureType = reference to procedure(aText: string);

var
  A: TMyAnonymousProcedureType;

begin
  A:= procedure(aText: string) //No semicolon here
                begin
                  Writeln(aText);
                end;
  A('Hello world');
  A('Good bye');
  Readln;
end.

As you can see in the example above, we have assigned code directly to the variable A. Then, we called A with parameters, and VoilĂ !: we have accomplished our reckless task with anonymous methods as well.

Pay attention to this:  if you are tented to declare variable A like this:

var
  A: reference to procedure(aText: string);

Don’t! That shortcut doesn’t work. You’ll get a compilation error…like this:

Undeclared identifier: ‘reference’

So, you do need to declare:

type 
   TMyAnonymousProcedureType = reference to procedure(aText: string);


Only later you can define the type of variable A.

You might be asking by now: why to bother with all this? What's the benefit? Well, in the previous example there’s little or none benefit present.

Generally speaking, anonymous methods are handy in the following cases:
  • You have been trying to name a local method for hours. You cannot think of a name for it. Well, think no more: use anonymous methods. Don’t put a tasteless name like Foo(), XXX(), Aux(), etc.
  • You create a function that is called just once(it’s just called from one spot).
  • You can use anonymous methods to provide elegant and simpler implementations. This is the case when combining generics types with anonymous methods for example. I should write about this shortly. Subscribe to my feed and stay tuned :-)
With this post I wanted to introduce anonymous methods to you. It’s OK if you don’t see the benefits clearly right now. You’ll get there :-)

Hide the utter "Create" constructor of TObject in Delphi

In Delphi, constructors can be inherited; this doesn’t happen in Java, C# and C++ for example. Furthermore, constructors in Delphi can have multiple and different names; usually they are called Create, but this is just a convention, since you can define a constructor with whatever name you choose.

In addition to all this, all classes in Delphi inherit ultimately from TObject, which contains a public parameterless constructor, named Create.

Due to the facts above, it‘s easy to understand that all classes in Delphi have a public Create parameterless constructor, that has been inherited from TObject.

I am not going to discuss here whether this is bad or good. What I want to show you is a way to hide the public Create parameterless constructor of TObject in case you need to do so.

Burn this out: you cannot hide any member (field, method, constructor, destructor) in Delphi by decreasing the level of visibility. If a member in a superclass is public, you cannot hide it in a child class by changing the visibility to protected or private. Once public you are always public. This means, you cannot hide the public Create parameterless constructor of TObject by lowering its visibility in an inheriting class.

So, how can we hide the Create constructor of TObject? Is there even a way for doing so? Yes, there is a way. We came to the solution in the LinkedIn’s Delphi Professionals group. I thought it would be worthy to share this with the rest of the Delphi community.

Basically, you can hide the public Create parameterless constructor of TObject with another public method having the same Create name. For example:

Class definition snipped:

TSomeClass = class(TObject)
public
//this constructor takes two parameters, and hides the TObject.Create()
constructor Create(aParameter1: string; aParameter2: Integer );
end;

Consuming code snipped:

var
  SomeObject: TSomeClass;
begin
  SomeObject:= TSomeClass.Create; //This does not compile!

  //This compiles. Uncomment and try...
  // SomeObject:= TSomeClass.Create('Hello People!', 12);

  try
    //TODO
  finally
    SomeObject.Free;
  end;
end;

See, in the code above the TObject.Create() has been hidden :-)

There is another consideration though: What happens if we overload the Create constructor?

TSomeClass = class(TObject)
public
  //this one takes two parameters, and hides the TObject.Create()
  constructor Create(aParameter1: string; aParameter2: Integer ); overload;
  constructor Create(aThisTakesAChar: Char); overload;
  constructor Create(aThisTakesAnInteger: Integer); overload;
end;

By overloading the Create constructor we have made the TObject.Create() visible again. If we want to keep it hidden, then we should avoid overloading. For that, you can simply use a different name for the new constructors being added. Something like this:

TSomeClass = class(TObject)
public
  //this one takes two parameters, and hides the TObject.Create()
  constructor Create(aParameter1: string; aParameter2: Integer );
  constructor Create2(aThisTakesAChar: Char);
  constructor Create3(aThisTakesAnInteger: Integer);
end;

Now the TObject.Create() constructor is hidden again.

Consuming code:

var
  SomeObject: TSomeClass;
begin
  SomeObject:= TSomeClass.Create; //This does not compile!

  //This compiles. Uncomment and try...
  // SomeObject:= TSomeClass.Create('Hello People!', 12);

  //This compiles. Uncomment and try...
  // SomeObject:= TSomeClass.Create1('H');

  //This compiles. Uncomment and try...
  // SomeObject:= TSomeClass.Create2(12);

  try
    //TODO
  finally
    SomeObject.Free;
  end;
end;

Why would someone want to hide the TObject.Create() anyway? It depends on the situation. I have found this very useful when implementing a singleton class in Delphi. For details refer to: Singleton class in Delphi.

As a conclusion, you can hide the TObject.Create() constructor by defining a new public method with the name Create in the inheriting class. You cannot hide TObject.Create() by lowering the visibility to protected, private, etc.