How to open a checking account at Tangerine?

Everything at Tangerine is done online… opening a checking account is no different: you can do it in 10 minutes (at the most) from the comfort of your home computer while you are in your pajamas. What I have found so far about Tangerine (formerly ING DIRECT) is that all procedures can be done with an extreme simplicity and from the comfort of your home.

Tangerine calls its checking account: Tangerine Checking Account. It was called THRiVE Chequing Account in the times when the bank was called  ING DIRECT.

Most checking accounts in Canadian banking institutions charge you a monthly fee. This is ridiculous if you ask me: banks are profiting from our own money, but that’s not enough for them: they still charge us a monthly fee for having our own money within their grasp, money from which they are profiting already.

This is what a Tangerine Checking Account has to offer:
  • NO MONTHLY FEES. Ask yourself if your current bank charges you a monthly fee and ask yourself if you should be paying for it?
  • Unlimited transitions: once again, you can perform unlimited transitions at Tangerine for free.
  • Earn interest on the money you put on your Tangerine Checking Account (yes, you heard well: this is a checking account that pays interest, just as saving accounts do).
I am not going to load you with more details…if you want to know more about the benefits of opening a Tangerine Checking Account come here: http://www.tangerine.ca/en/chequing/chequing-account/index.html.

Now, in order to open a Tangerine Checking Account you have to do only TWO things:
  1. Complete an online form that won’t take you more than 10 minutes. I am not exaggerating: this form won’t take you more than 10 minutes to fill. In order to fill the form click here: Open a new Tangerine Checking Account.
  2. Write your initial deposit cheque (payable to yourself) for at least $100, and mail it to Tangerine Bank, 3389 Steeles Avenue East, Toronto, Ontario, M2H 3S8. Note: all new clients of Tangerine opening accounts for at least $100 bucks get a $50 bonus. What does this means? It means that you open your account with $100, but you are credited with $150; so Tangerine welcomes you with $50 bucks.
That’s all: by completing the two steps above you will open a Tangerine Checking Account, that will treat you with unlimited transactions, no monthly fees, saving interests and a $50 bucks welcome gift.

If you have any questions, drop a line in the comments section below. I’ll do my best to answer.

If you think this post might be useful to someone else, don’t hesitate in recommending by clicking the Google Plus (G+) button at the beginning of the post. Thanks!
HMAC functions in Delphi (HMAC_SHA256, HMAC_SHA1)

I came across HMAC (Hash-based message authentication code) functions when developing a RESTful client application in Delphi. The RESTful Web Service API required me to send HMAC_SHA256 signatures (Base64 encoded) with each HTTP request.

HMAC functions take two parameters: a key and a message. The purpose of the HMAC function is to authenticate the message and guarantee the data integrity of the message.

The cryptographic strength of the HMAC function lies on the underlying hashing function that it uses: MD5, SHA1, SHA256, etc.

So, these functions are usually are termed HMAC_SHA256, HMAC_SHA1, HMAC_MD5 to connote the core hashing function being used.

The outcome of a HMAC function is basically an array of bytes, but it is usually represented as a hexadecimal string or encoded as a Base64 string. (The RESTful Web Service API needed the Base64 encoded output).

I Googled around for a bit, but I didn’t get a clean implementation of HMAC_SHA256 in Delphi (encoded as Base64). I glued together the pieces from some questions on StackOverflow and coded an Indy based implementation that uses generics to specify the core hashing function.

Brief description: I created a helper class called THMACUtils. Note that this class uses generics to indicate the hashing algorithm (TIdHMACSHA256, TIdHMACSHA1). Three functions are provided:  the main thing happens in the HMAC(...) function; HMAC_HexStr(...) and HMAC_Base64(...) are simply decorations of the output.

unit HMAC;

interface

uses
  System.SysUtils,
  EncdDecd,
  IdHMAC,
  IdSSLOpenSSL,
  IdHash;

type
  THMACUtils<T: TIdHMAC, constructor> = class
  public
    class function HMAC(aKey, aMessage: RawByteString): TBytes;
    class function HMAC_HexStr(aKey, aMessage: RawByteString): RawByteString;
    class function HMAC_Base64(aKey, aMessage: RawByteString): RawByteString;
  end;

implementation

class function THMACUtils<T>.HMAC(aKey, aMessage: RawByteString): TBytes;
var
  _HMAC: T;
begin
  if not IdSSLOpenSSL.LoadOpenSSLLibrary then Exit;
  _HMAC:= T.Create;
  try
    _HMAC.Key := BytesOf(aKey);
    Result:= _HMAC.HashValue(BytesOf(aMessage));
  finally
    _HMAC.Free;
  end;
end;

class function THMACUtils<T>.HMAC_HexStr(aKey, aMessage: RawByteString): RawByteString;
var
  I: Byte;
begin
  Result:= '0x';
  for I in HMAC(aKey, aMessage) do
    Result:= Result + IntToHex(I, 2);
end;

class function THMACUtils<T>.HMAC_Base64(aKey, aMessage: RawByteString): RawByteString;
var
  _HMAC: TBytes;
begin
  _HMAC:= HMAC(aKey, aMessage);
  Result:= EncodeBase64(_HMAC, Length(_HMAC));
end;

end.

Below there’s an example of how to use the THMACUtils class.

program HMACSample;

{$APPTYPE CONSOLE}

{$R *.res}

uses
  System.SysUtils,
  HMAC,
  IdHMACSHA1,
  IdHashMessageDigest;

begin
  try
    Write('HMAC_SHA1("key", "message")'#9#9'= ');
    Writeln(THMACUtils<TIdHMACSHA1>.HMAC_HexStr('key', 'message' ));
    Writeln;

    Write('HMAC_SHA256("key", "message")'#9#9'= ');
    Writeln(THMACUtils<TIdHMACSHA256>.HMAC_HexStr('key', 'message' ));
    Writeln;

    Write('HMAC_SHA1_Base64("key", "message")'#9'= ');
    Writeln(THMACUtils<TIdHMACSHA1>.HMAC_Base64('key', 'message' ));
    Writeln;

    Write('HMAC_SHA256_Base64("key", "message")'#9'= ');
    Writeln(THMACUtils<TIdHMACSHA256>.HMAC_Base64('key', 'message' ));

    Readln;

  except
    on E: Exception do
      Writeln(E.ClassName, ': ', E.Message);
  end;
end.

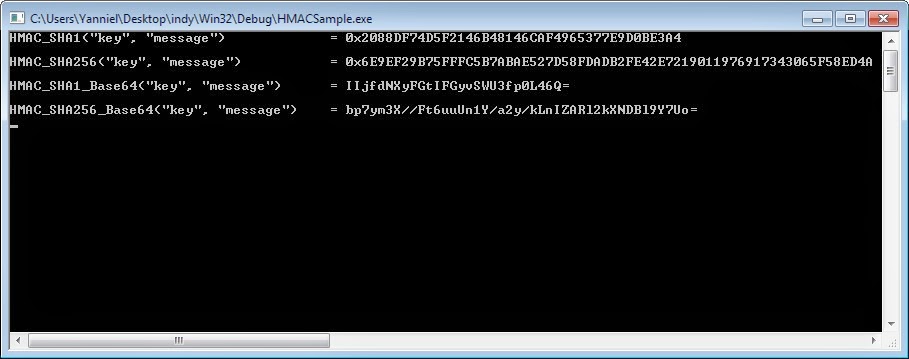
The console application above looks like this:

HMAC Sample Application Delphi

How to obtain an “Option C Printout” from the CRA?

When you are sponsoring a family member to come to Canada, you are required to provide an Option C Printout of your last Notice of Assessment for the most recent taxation year.

An Option C Printout is not a Notice of Assessment. An Option C Printout is a document that summarizes your income and deductions for a particular taxation year. It is usually referred to as Proof of income statement (Option ‘C’ Print).

How to obtain an Option C Printout?

This can be done either:
  • By Phone or
  • Over the Internet (online).
If you think this information might be useful to others, please, click the Google Plus (G+) button at the beginning of this post.

By Phone

Call Canada Revenue Agency (CRA) at this number: 1 (800) 959-8281. Sometimes the number is busy; in which case try again a few minutes later until you get connected.

You will be listening to an interactive recorded message; hence, a computer will be doing the talking...

Listen carefully and select the option that allows you to get the Option C Printout.

You will need to type these three pieces of information over the phone:
  1. Social Insurance Number. 
  2. Date of Birth.
  3. Amount of Income you reported on Line 150 of your most recent taxation year.
Make sure you have the information above otherwise the computer won’t be able to authenticate you.

Once you finally enter the info, the automatic system (computer) will tell you that you have succeeded, in which case the Option C Printout will be mailed by postal mail to the address you have on record with the CRA.

For instructions about how to update (change) your address with the CRA refer to the following link:

Over the Internet (online)

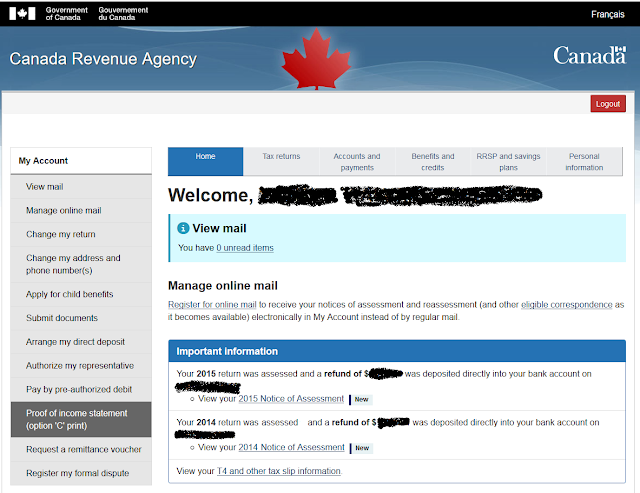
You need to register online with the My Account service of the CRA. Once you are registered with them, just login and look to the left where you will see the My Account menu. Click the option Proof of income statement (Option ‘C’ Print) which will allow you to print the required document.

The link to register and/or login with My Account is this:

http://www.cra-arc.gc.ca/myaccount/

Below you can see a snapshot of how My Account looks like.

My Account – CRA – Proof of income statement (Option C Print)
Related Articles:

Coin collection - 100th Anniversary of the Canadian Arctic Expedition (year 2013)

I got the 14k Gold Coin as a wedding gift from a friend. I loved that coin immediately. Later on I bought the remaining silver coins in this collection from the Royal Canadian Mint. I must say the quality of the images below is not really good. The real coins are impeccably beautiful.

Coins from left to right, top to bottom:
  • Brilliant Fine Silver Dollar  (Mintage: 02610/20000 )
  • 14k Gold Coin (Mintage: 0218/2500)
  • Proof Fine Silver Dollar (Mintage: 12866/40000)
  • Fine Silver Proof Set (Mintage: 21285/25000)
Coin collection - 100th Anniversary of the Canadian Arctic Expedition (year 2013) - [Reverse]

Coin collection - 100th Anniversary of the Canadian Arctic Expedition (year 2013) - [Obverse]


The Canadian Arctic  Expedition 1913-1916

On the antique celluloid, the light flickers. Sled dogs move silently across the Arctic tundra. A man perched on an ice floe surveys the horizon as teams of men and dogs prepare for ice-bound travel behind him. In the distance snow-capped mountains rise into the sky like jagged shards of ice.

In grainy photos, men stand alongside makeshift fences, before shelters made of skins and furs, in open ice fields, atop sleds packed with gear. Some smile; others stare silently into the lens, arms crossed, thoughts unfathomable.

These are only a few of the approximately 4,000 photographs and more than 2,700 metres of film capturing one of the twentieth century’s most exciting moments in exploration: the Canadian Arctic  Expedition.

In 1913, Canadian Prime Minister Sir Robert Borden commissioned an expedition, led by Manitoba-born ethnologist Vilhjalmur Stefansson, to explore and map the western Canadian Arctic. Stefansson and zoologist Rudolph Anderson had travelled through the Far North the previous decade. Knowing that there was a great deal of unexplored potential in the region, Stefansson planned to continue his earlier journey, but the Government of Canada, recognizing the importance of new sovereign territory, hosted the Expedition and broadened its mission significantly. A Northern Party led by Stefansson would undertake the mapping exercise while a Southern Party led by Anderson would explorer the geology, resources, and native inhabitants of the northern mainland.

Traveling by sea and despite significant hardships, the Northern Party covered thousands of kilometres, mapping land that even the local inhabitants had never seen. The Northern Party discovered four new islands and proved that some of the geography proposed by nineteenth century expeditions was erroneous.

The Southern Party completed the full mapping of the mainland and produced 14 volumes of scientific data as well as thousands of specimens and artefacts, opening up a new world of wonder for Canadians. Their findings included information about flora and fauna never before recorded, fossil samples, and more. Their cultural research familiarized the world for the first time with the culture and way of life of the Copper Inuit and the aboriginal peoples of the Northwest Territories, Yukon Territory, Alaska and Siberia. From these Aboriginal peoples – some of whom participated in the Expedition as guides and other assistants- they collected artistic artefacts, tools, knowledge, and thousands of photographs as well as extensive film footage.

The Expedition’s artefacts, photos, and recordings enabled researchers to introduce to the rest of the world cultures that had been virtually inaccessible until that time. The artefacts have also had a broad educational legacy, forming the basis of numerous educational programs and museum exhibits, and are an important pillar of the permanent National collections of the Canadian Museum of Nature and the Canadian Museum of Civilization.

14k Gold Coin - 100th Anniversary of the Canadian Arctic Expedition

This 100-dollar coin is certified to be 14-karat gold with a metal content of 12 grams and a diameter of 27 millimetres. In this design, Canadian artist Bonnie Ross depicts several key images representative of the Canadian Arctic Expedition, including a survey team atop an ice floe taking research measurements and, in the background a stylized map of the Canadian Arctic. The obverse features the effigy of Her Majesty Queen Elizabeth II by Susanna Blunt.

Brilliant Fine Silver Dollar / Proof Fine Silver Dollar - 100th Anniversary of the Canadian Arctic Expedition

Both the brilliant uncirculated  silver dollar and the proof silver dollar in this collection  are certified to be 99.99% pure silver with a diameter of 36.07 millimetres and a weight of 23.17 grams. Designated by Canadian artist Bonnie Ross, the reverse image draws on photography from the Canadian Arctic Expedition, depicting a group of three men aboard  a dogsled, the waiting dog team before them listening for the command to move across the Arctic tundra. The skyline and horizon behind this portrait are filled with a stylized image of a compass. The obverse features the effigy of Her Majesty Queen Elizabeth II by Susana Blunt.

Fine Silver Proof Set - 100th Anniversary of the Canadian Arctic Expedition

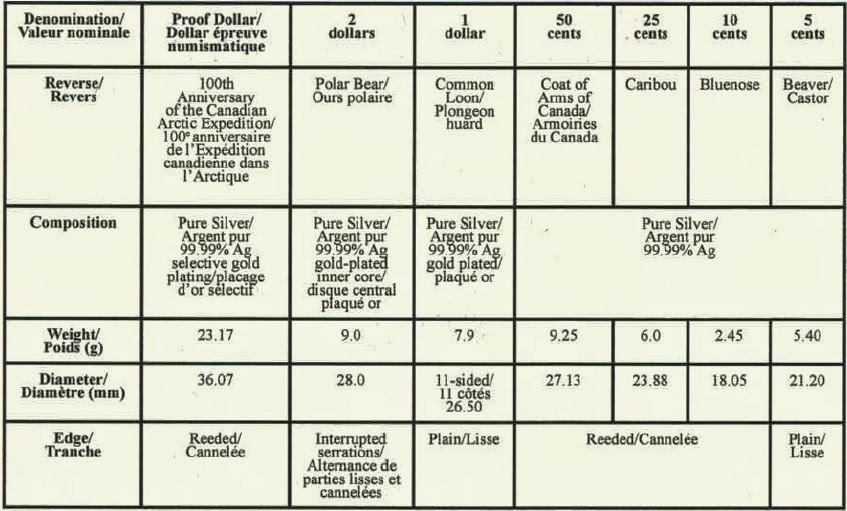
This is the 2013 fine silver proof set of Canadian coinage. This is the only set that features the commemorative silver dollar selectively gold-plated and the gold-plated one-dollar coin depicting the common loon.

The chart below shows the characteristics of each coin in the 2013 Fine Silver Proof Set of Canadian Coinage.

Characteristics of each coin in the 2013 Fine Silver Proof Set of Canadian Coinage

Proof of medical examination - Medical Report: Client Biodata and Summary (IMM 1017 Form)

As part of the Application to Sponsor a Member of the Family Class, the sponsored person and their family members are required to provide “proof” that they have undergone a medical examination.

I am sponsoring my wife to come to Canada, she lives currently in Cuba and I have been living in Toronto for the last 4 years.

When I first heard about this “proof of medical examination”, I asked myself:
  • What do they mean by “proof”?
  • How can I obtain this “proof”?
  • How does this “proof” look like?
For the purpose of sponsoring a Member of the Family Class, Citizenship and Immigration Canada (CIC) requires you to mail the IMM 1017 Form as proof that the medical examination took place with an authorized Panel Physician.

In other words, the IMM 1017 Form, also known as Medical Report: Client Biodata and Summary, is the "proof" you are looking for. This form is one page long and you will have to mail the corresponding IMM 1017 Forms not only for the sponsored person, but also for their family members (dependants), if any.

We obtained this form directly from the Panel Physician that examined my wife. We didn’t have to provide a blank form for the doctors to fill. They handled this form to my wife at the end of the medical examination.

This form does not contain the results of the medical results; it’s merely a confirmation that the person in question was examined by an authorized Panel Physician.

Below I have added for reference the IMM 1017 Form that my wife received. I erased all personal data from the form and I also scrambled the barcode. 
I wanted to share this knowledge because the information provided about this topic in the CIC website is quite slim. You should know that I am not a legal or immigration expert. I just want this information to be useful, but you use it at your own risk.

If you think this information was useful, please, consider clicking the Google plus button (G+) at the beginning of this post. Thanks!

Related article: